Today we look at the game Stewart Holdaway vs Mathew King, from the Palmerston North Club championship, 13th November 2008.

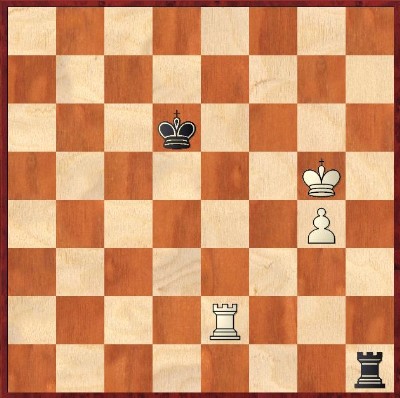
Here we reach the position with White about to make his 51st move. Let's look closely at the position and find out what's really happening here. Rook endgames happen in about 8% to 10% of all games, so its important to have some basic knowledge of them, and this will gain us many points in future games. Hence this example is very interesting and important.
First to evaluate the position we look at the Material
White has a King, Rook and a pawn
Black has a King and Rook
So we now know White has a clear advantage being a pawn up.
The next question is White's advantage winning? To work this out we can see that White's advantage is in his pawn up, so in order for White to win, as with most endgames, he must Queen his pawn.
The next step is we have to evaluate the position of all the pieces and see what their role and function is in the current position. Our Goal is to come up with a plan to Queen White's pawn. To see if this is possible and what's the best plan to achieve the goal.
Rook
White's Rook on e2, is keeping Black's King well away from the important White pawn. If Black were to close his eyes the White pawn would happily run to his queening square on g8. So Black must use his remaining pieces (King and Rook) to prevent this. With the White Rook keeping Black's King out of play, Black has lost the chance of his King's help in the defence, and only has at this time his Rook to stop the advance of the White pawn (helped by the White King). This is an important point, so we now know White's Rook is very well placed and doing an important job
Pawn
White's pawn on g4 is 4 squares away from becoming a Queen. The White pawn also has his King keeping it protected. The Black King is kept out of action by the White Rook. So the only danger to the White pawn is from the Black Rook. Also important to note:- if Black were simply to give up his Black Rook for White's pawn, he would then be in a losing position as White would have his King and Rook vs Black's lonely King.
Rook
Black's Rook is the only chance Black has to stop White's pawn from becoming a Queen. The Black Rook on h1 is very well placed as Rooks are long range pieces, Black must keep his Rook at a distance to attack the White's King and pawn.
So the first step in the plan, is to see how much progress (how far we can advance the pawn) we can make using only the White King and pawn vs Black's Rook. Remember White's Rook is doing an important job keeping Black's King out of action, and we don't want to move this Rook until we absolutely have to.
Now here in the game White went wrong with 53 Rf2? This is a bad move as there is no reason to move this Rook until you absolutely have to e.g. no more progress can be made with just the White King and pawn. White went on to play a series of random moves with no plan and not surprisingly was unable to win this position and agreed a draw on move 73.
Let's see how White should proceed. Remember the Plan - queening the pawn! Also remember we don't want to move the White Rook until we have to, as we want the Black King kept away from the Action. To see how White should play to win, we'll take over the White pieces and let the strongest computer program Rybka play the Black pieces. We use a computer program to play the Black pieces to test if our ideas are correct and we not talking rubbish.
53 Kh6 Whites moves his King to allow the White pawn to advance. 53...Rh1+ 54 Kg7 White's King moves in front of the pawn to get away from the Black Rook's check, while leaving an extra square on the g6 square for the pawn to advance again. 54...Rh3 if Black had played 54...Rg1 then White simply advances the pawn with 55 g6 as in the game. Black is trying to keep White's King off the h-file 55 g6 Whites plan is going very well and his pawn is now only two squares away from the queening square g8. 55...Rg3 56 Kf7 making room for the White pawn to advance to g7 56...Rf3+ 57 Kg8 same idea as we saw before, moving the White King in front of the White pawn and leaving an extra square for the pawns advance. 57...Rg3 58 g7 again we see White's plan has been very successful so far and now the White pawn is only one square away from queening 58...Rh3
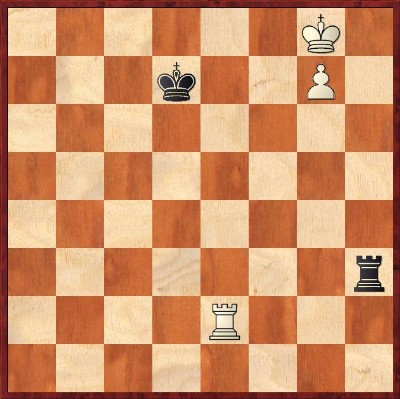
Now we have completed the first part of the plan - making as much progress with the White King and pawn as possible. Now White cannot get his pawn any further with just his King as Kh8 runs into Rh3+ and Kf8 runs into Rf3+ forcing the King back to g8. Now is the time to use the White Rook!
Important to note:- we have now reached the very famous Rook endgame position - the Lucena position (This is the tricky part of winning this game). Study of this position and these notes will pay high rewards for any players keen to improve. In fact had the White Player known the ideas in this article he would have won this game instead of just a draw!
"The so-called Lucena position is named after the Spaniard Luis Ramirez de Lucena, although is something of a misnomer, because the position does not in fact appear in his book on chess, Repetición de Amores e Arte de Axedrez (1497). It does appear, however, in Alessandro Salvio's Il Puttino (1634), a romance on the career of the chess player Leonard da Cutri" - (Wikipedia)

More information on the Lucena position can be found in most good endgame books, or you can search the internet.
The technique is also referred to as "building a bridge" - to allow the White King to step beside his pawn without being chased of by an unwelcome check from the Black Rook.
On with us having the White pieces vs Rybka the Worlds strongest computer program having the Black pieces.
59 Re4 the first step in building a bridge to protect the White King from the checks of the Black Rook. 59...Kd6 if Black tries 59...Rf3 then White achieves his bridge by 60 Rh4! And Black cant stop White playing 61 Kh8 and 62 g8/Q queening the pawn and winning. 60 Kf7 Rf3+ 61 Kg6 Rg3+ 62 Kf6 Rf3+ 63 Kg5! This is the key idea! 63...Rg3+ 64 Rg4! Black has now run out of checks and cant stop the White pawn queening!
Hopefully you would have found this article helpful. And learnt something that will be useful in your own games, and bring you some points in competitions.
Stewart asks - "I read the article, and have been practising this endgame vs Fritz (strong computer program). What would have happened if black had played his rook to the h8 square instead of the h1 square"
Great question Stewart! I would also like to comment that it is very diligent that Stewart has taken the time to work on this endgame position by playing these positions against a Strong Computer Program. Regardless of the result of this game, clearly Stewart has gained a valuable learning experience from this game, and has worked hard to make sure he receives the most possible benefit from this experience. Full marks to Stewart! Great benefits to our Chess Strength can be gained by recording our games, and carefully reviewing them with a Stronger Player or Computer Program like Fritz or Rybka, especially our draws and losses. No one is born a Strong player, so this is exactly the method we can use to improve and make great leaps in our Chess strength.
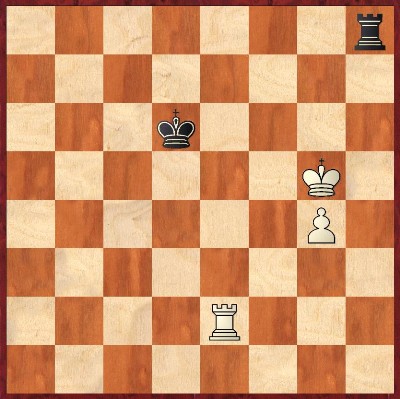
Now on to Stewart's Question, if Black had played 50...Rh8, instead of 50...Rh1 (reaching the position given above at the start of the this article).

Now 51 Kg6 is no good because of 51 ...Rg8+ forces the White's King back, and stopping Whites progress. The correct move is therefore 51 Kf6! Now White not only threatens to advance his all important g-pawn, but is also threatening 52 Rd2+ forcing Black's King to the c-file, even further away from the action, and achieving an even better position than he did in the above article. 51...Rf8+ Black's only move to met the threat of Rd2+. 52 Kg7! another powerful move taking control of the queening path of the g-pawn ( g6.g7.g8 squares) and attacking Black's Rook. No matter where Black moves his Rook ( Ra8 or Rf1), White will play 53 g5 and then 54 g6 and the g-pawn will be safe and White will reach a similar position in the article and win easily.